Unreal + Jenkins DevOps: Zero To Hero
- Lee Choon Meng (Xynan)

- Apr 30, 2021
- 5 min read
Updated: May 21, 2021
How many times have wasted precious time pushed out a faulty build due to some configuration Boolean changed for testing purposes? Or simply just staring blankly at your screen unable to anything while waiting for the build to finish? We all have that moment. Therefore, Jenkins is here to the rescue.
Note: In order to bring out the full potential of Jenkins, I highly recommended you to use it with Unreal Automated Testing as it will automatically test your code before it is being cooked. You can check out here: https://xynanxdb.wixsite.com/portfolio/post/unreal-automated-testing to learn more about Unreal Automated Testing.
In this tutorial, I will demonstrate the most realistic CI (continuous integration) pipeline that a company would use. So, there will be a few prerequisites that we need to have first.
Step 1: Setting up Jenkins
I won't be showing how to set up Jenkins in this tutorial as there are many resources on this matter, doing so will only make this tutorial super long-winded. So, set up your Jenkins first then come back here and continue.
Step 2: Installing Jenkins Plugins
There are multiple 2 plugins we need to install in order to make use its full potential with Unreal Automated Testing.
Parameterized Trigger Plugin: This is very useful as you can swap different build configurations easily.
PowerShell plugin: A plugin that you need if you chose to use it in conjunction with Unreal Automated Testing (you will find out why later).
After installing these plugins, you might need to restart Jenkins service in order for the plugins to take effect.
Step 3: Create a New Freestyle Project
Click on New Item, then create a Freestyle project. This will be the working directory for your Unreal builds. It's time to do some configurations.
Step 4: Configurate Parameterized Builds
Parameterized builds will allow our to swap different build configurations with ease. To enable it we need to check the box for "This project is parameterized". For me, I have these parameters:
Choice Parameter
Name: ENGINE_VERSION
Choices: INSERT_YOUR_ENGINE_VERSION
Description: UE4 version used to make the build
===============================================
String Parameter
Name: OUTPUT
Default Value: INSERT_ABSOLUTE_PATH
Description: The destination of final build
===============================================
String Parameter
Name: PROJECT_NAME
Default Value: INSERT_PROJECT_NAME
Description: The name of the .uproject file. (MUST BE EXACT, VERY IMPORTANT)
===============================================
String Parameter
Name : TEST_PREFIX
Default Value: INSERT_TEST_IDENTIFIER
Description: Identifier for Unreal Automated Tests to search for tests. (Learn more from my Unreal Automated Testing blog post).
===============================================
String Parameter
Name: BUILD_TOOLS
Default Value: INSERT_MSBUILDTOOLS_ABSOLUTE_PATH
Description: MSBuildTools required to build the project.
===============================================
String Parameter
Name: COMPRESSOR
Default Value: INSERT_COMPRESSION_SOFTWARE_ABSOLUTE_PATH
Description: Compression software used to compress the final build.
===============================================
String Parameter
Name: ENGINE_ROOT
Default Value: INSERT_ENGINE_ROOT_DIRECTORY
Description: The directory to where Unreal Engine is.
Note: TEST_PREFIX can be omitted if you chose not to use it with Unreal Automated Testing.
Step 5: Linking up Source Control
Hooking up your project repo in your chosen source control. If you are not using Git, you might need to download your preferred source control plugin. You can also specify which branch to build in Branches to build.
Step 6: Setting up Build Triggers
Typically, you would want Jenkins to build on a regularly basis. If so, you can check Poll SCM so that check the source control on based on the schedule provided. I personally used H 20 * * 5, so that a build would trigger every Friday at 8-9 PM.
Step 7: Configure Build Steps
This is the bread and butter of Jenkins, it is very where you build instructions placed. These instructions will run every time a build triggers. If an error occurs in any part of the sequence, the build fails. My current sequence is:
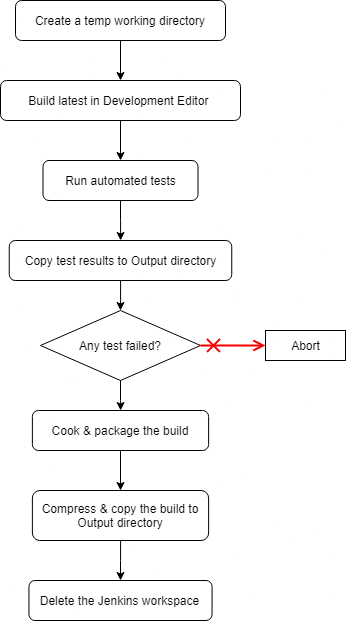
Sequence 1: Create a temp working directory
Windows Batch Command
rd /s /q tempThis command won't do much if you don't have the temp folder as it is intended to clear the temp working directory we create when we specify the archivedirectory in Sequence 4.
Sequence 2: Build latest in Development Editor
Windows Batch Command
"%ENGINE_ROOT%/%ENGINE_VERSION%/Engine/Binaries/DotNet/UnrealBuildTool.exe" -projectfiles -project="%WORKSPACE%/%PROJECT_NAME%/%PROJECT_NAME%.uproject" -game -rocket -progressThis command will generate the latest Visual Studio files to refresh the latest files and bindings.
Windows Batch Command
"%BUILD_TOOLS%" "%PROJECT_NAME%\%PROJECT_NAME%.sln" /t:build /p:Configuration="Development Editor";Platform=Win64;verbosity=diagnosticThis command will build the project file into Development Editor configuration in Win64.
So far, so good? You can test your configuration by going back to the project panel and building your project by clicking Build with Parameters. If everything is well, you should see a new entry in your Build History like this:

The blue ball indicates the current pipeline is successfully. Then we can continue next sequence.
Sequence 3: Execute Automated Tests
Windows Batch Command
"%ENGINE_ROOT%%ENGINE_VERSION%/Engine/Binaries/Win64/UE4Editor-Cmd.exe" "%WORKSPACE%/%PROJECT_NAME%/%PROJECT_NAME%.uproject" -unattended -nopause -NullRHI -ExecCmds="Automation RunTests %TEST_PREFIX%" -testexit="Automation Test Queue Empty" -log -log=RunTests.log -ReportOutputPath="%WORKSPACE%/Saved/UnitTestsReport"This command will run automated tests headlessly, with tests there are prefixed by TEST_PREFIX. The final report will appear in ReportOutputPath.
You can build the project again and see if it works. You will see the Console Output will display this weird error:
[default] [error] UnrealEditorServer-PROJECT.uproject: accepting failed, reason: Invalid socket handle.This is due to Unreal disconnects from Jenkins when it runs the automated tests.
This will cause a few problems:
unable to see the test results in Jenkins Console Output which is a huge inconvenience.
Any failed test will not stop this build pipeline so, a faulty build is pushed out.
To fix this, we need to do a small side quest.
Side Quest: Reconnecting the Test Results to Jenkins
Windows Batch Command
if not exist "%OUTPUT%\%PROJECT_NAME%_%BUILD_NUMBER%" mkdir %OUTPUT%\%PROJECT_NAME%_%BUILD_NUMBER%This command will create the output directory if the folder does not exists.
Windows Batch Command
ren %WORKSPACE%\Saved\UnitTestsReport\*.json TestResult_%BUILD_NUMBER%.jsonThis command will rename the test result json file into a more legible name.
Windows Batch Command
copy %WORKSPACE%\Saved\UnitTestsReport\*.json %OUTPUT%\%PROJECT_NAME%_%BUILD_NUMBER%This command will copy that test result json file to the Output directory.
PowerShell
$JsonString = Get-Content -Raw -Path $env:WORKSPACE\Saved\UnitTestsReport\TestResult_$env:BUILD_NUMBER.json | ConvertFrom-Json;
$JsonObj = $JsonString | ConvertTo-Json;

$JsonObj

if ($JsonString[0].failed -ne "0")
{
   $ErrorActionPreference = 'Stop';
   Write-Error "Tests failed: $($JsonString[0].failed)"
}
This block of PowerShell command the main mechanism to reconnect the test result back to Jenkins. Essentially, it converts and reformat the json file into texts and print it onto Console Output. Then, it will fail this entire build pipeline if the test results shows any failed tests. Make sure Stop On Errors is checked, or else the pipeline won't fail. Side quest completed!!
Sequence 4: Cook and Package the Build
Windows Batch Command
"%ENGINE_ROOT%/%ENGINE_VERSION%/Engine/Build/BatchFiles/RunUAT.bat" BuildCookRun -nocompileeditor -installed -nop4 -project="%WORKSPACE%/%PROJECT_NAME%/%PROJECT_NAME%.uproject" -cook -stage -archive -archivedirectory="%WORKSPACE%/temp/Development_x64" -package -ue4exe=UE4Editor-Cmd.exe -clean -pak -prereqs -targetplatform=Win64 -build -target=%PROJECT_NAME% -clientconfig=Development -utf8outputThis command will trigger the cook, build and package stage for the project.
Note: You can parameterize targetplatform is your want to build for other platforms. You can also parameterize clientconfig is wanted to choose between Development, Shipping, Debug, etc.
Sequence 5: Finalizing the Build
Windows Batch Command
ren temp\Development_x64\WindowsNoEditor %PROJECT_NAME%_%BUILD_NUMBER%_Development_x64By default the build folder is named WindowsNoEditor by Unreal. So, this command will rename it based on the project name and build iterations.
Windows Batch Command
"%COMPRESSOR%" a -t7z %OUTPUT%/%PROJECT_NAME%_%BUILD_NUMBER%/%PROJECT_NAME%_%BUILD_NUMBER%.rar "%WORKSPACE%/temp/development_x64/%PROJECT_NAME%_%BUILD_NUMBER%_Development_x64"This command will use the compression software we specified in COMPRESSOR to compress the build folder and move it to the Output directory.
Note: This example uses 7-zip, the command might vary if you are using other compression software.
Post-build Actions
I personally chose to Delete workspace when build is done because the workspace can be quite big and might bloat up overtime. Finally, click Apply to apply all the configurations.
That's it!!
This is just one use case of Unreal Automated Tests + Jenkins. You can customize your own commands and do different Post-build Actions to enhance your team's efficiency.

API Connects is a leading IT firm in New Zealand, specializing in IoT development, IoT solutions, and data engineering services. We provide cutting-edge IoT solutions to enhance business operations and data engineering services for seamless data migration and optimization. Our expert DevOps team ensures secure core banking data migration for financial institutions. Visit- https://apiconnects.co.nz/iot-development-testing-consulting/ , https://apiconnects.co.nz/data-engineering-services/